Intro:
For this project I was given the task tao survey a client with an idea of an affordable home to design as if it were going to be constructed in Noblesville, Indiana. The client I had chosen was my mother cause she has a great sense of what an affordable home looks like. When I surveyed her she asked the home to have 3 bedrooms, 2 baths, full kitchen, dining room, living room, and a deck. Due to habitat for Humanity building codes, a 3 bedroom home should be a maximum of 1070 square feet. The first step towards building the home was creating a bubble diagram which simply shows where the rooms will be roughly located to one another. What wanted to do was group the living room, dining room, and kitchen in one area and all the bedrooms in another. Once I rearranged the rooms in a couple of rough sketches to their final location, I used revit to create my first floor plan. I created the rooms to proportion with one another also fulfilling certain requirements about room space. Once the walls were in place I then placed windows in a way that brought more light to the living room and kitchen than the 3 bedrooms. The windows also allowed for the sunlight to enter the home in the winter to keep it a little warmer in the cold weather. From there I added doors so that they took up the least amount of space possible, then I added all the furniture and appliances. Once everything on the floor plan was complete I moved to the roof plan and built my roof over the walls. I connected the walls to the roof and my Home was complete. The next step was to place my home on the lot in Noblesville to see how it would look realistically. I also added a drive way and a couple of trees so that I could show my client the final product.

Here is the home viewed next to the street. I added the trees to create a type of privacy and add depth to the look of the house. It also provides shade on sunny days.
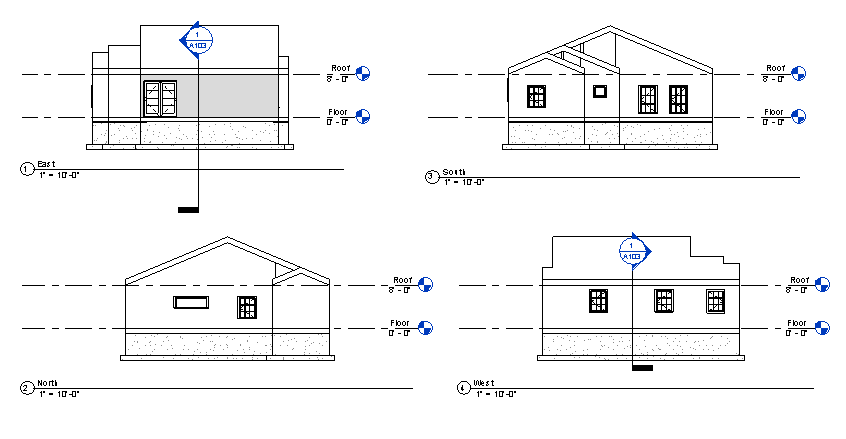
When designing the home I gave my best effort to place many windows on the south side of the building to maintain heat with in the home during winter. What I could of done though was add a window or two to the front to make it more appealing.
|
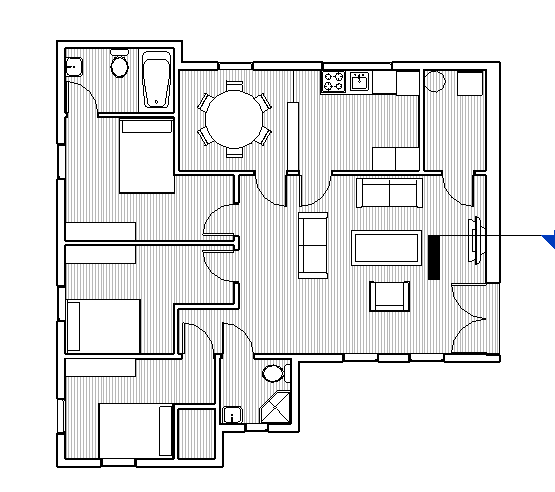
When arranging the rooms, I wanted to gather all the bedrooms in one area and all the other rooms that have noise in another area. This is so that when people are asleep they wont hear the noise in the other rooms.

When I added the house to the site I arranged it so that the driveway was easily accessible from the st and what i wanted to do was face the bedrooms where there is less noise. Since the lot was surrounded by streets I faced them to the alley to minimize noise.
|

This was a very easy step to accomplish, here I tagged the rooms so you could tell them apart and gave the area of each room.
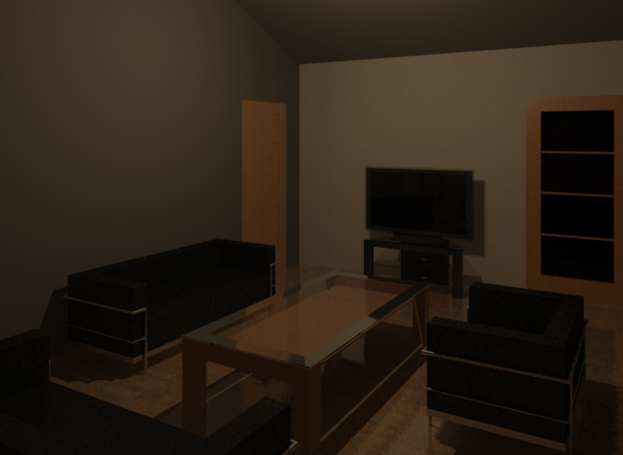
This is an indoor rendering of my living room. I placed the furniture like this so that it wouldn't take up too much space but also allows people to see and talk to one another.
|
Drawings:
- Bubble Diagram
- Rough sketch
- Wall section view
- types of foundation
- Plumbing plan sketch
Calculations:
- Water Supply: This calculated the amount of water that was need for the home, and how much water was easily available to the home as well. Here I also determined the size of my piping.
- Storm Water Runoff: These calculations calculated the amount of runoff pre and post construction of the home. When the home was placed runoff was increased due to the fact that water couldn't seep into the ground where it once could.
- Wastewater: This calculated and showed where and how the waste water will be disposed of from the house. I calculated the distance from the main sewage pipe and how each pipe would connect to one another to minimize the amount of energy need to remove the water.
Calculations:
learned a great amount from this project. The very first thing I learned from this project was how much work it takes before hand to building a house. There is so much consideration that goes into it, all the building codes, material, size, shape, position, and all these calculations that go behind it. I also learned how to design on revit much better, I know how to place components and how to make the building the way I want it to look like. Even though I did get stuck many times, I feel like the next time around I will be much more independent and quicker. Other things I learned was the type of foundations that are used for a building and how far down it needs to go underneath the building. Along with that was frost depth which is the level at where frost above ground cant reach anymore, which you need to know for a stable foundation. one important thing that I learned was to keep all types of bathrooms relatively close to one another so that you don't end up using more piping then needed so that you save on energy and cost. My favorite part of this whole project was placing the final home on the site and looking at it in 3D mode. I liked it so much cause it was my final product, even though it wasn't perfect, I still got to see how it would look like in real life. It was a moment where I could take a second and admire my work. On the other hand my least favorite part was placing a roof onto the building. Since it wasn't a perfect square there ended up being holes in the roof which I couldn't fix. The next time around however I would do a lot of the steps differently. First of all I would refer to the site plan much more often so that I can design the home to fit the land as best as possible. Also I would take more time to arrange the rooms, I wan the bathrooms and anything that uses water to be close to one another so that its easy for the plumbing to be installed. What Id also do differently is create the home so that itd be a square instead of having all these sharp turns in it. This would have made foundation, roofing, spacing, and much more things a lot simpler to build. one more thing I'd do differently is work a little more efficiently so that I can keep up with the process of building the home, cause as I found out, it isn't that easy. Overall I really enjoyed this project and it opened my eyes to what its really like designing a home.
